![]()
"Never a Dull Moment", by Mark Grable
Pointing up, or sharpening, the teeth, is traditionally done by hand with a feather file (yasuri), a name that refers to the pattern of teeth cut into the file. Single-faced files (kata omete) have two cutting edges and are necessary for edo-mae (crosscut) teeth. Double-faced files also have two cutting edges and may be used on the rip teeth, although these files are relatively coarse; you can, in fact, use single-faced files for rip teeth as well. A third type, etched files, are sometimes used on dozuki without set. These form a burr on the cutting edge that acts to plane the cutoff smooth. Its the last thing done to these saws, and may also be done to bamboo saws. One file should last for 5-6 saws, depending on the type of saw. Hardened saws can cut two or three times as much wood before loosing their fresh edge, but they eat files faster. These expensive nokogiri are less forgiving all around, and its best to learn on a less expensive, softer saw. If you want to point up your own saws, you will need at a minimum two yasuria 65mm and a 150mm. You will also need a wooden vise for holding the saw, a jointing tool such as a diamond stone or an 8" mill file, and 3.25x glasses with a 10x loupe. Not only sharpness but shape is made into the teeth with files. This is a complementary process, where the metates control must get the shape right, in the right place, and with a consistent cutting line. All this work must be done with extreme precision, which is why magnifying glasses are often used. Begin by taking the handle off the saw. This makes it quicker to flip the vise-with-saw end-for-end. As a side note, you can learn a lot about nokogiri, and get a better feel for the tool, by using the saw without the handle. Start with the rip teeth. After lightly jointing (making sure to keep the tool 90° to the body), the big yasuri is used to do the backs of the teeth set to the side away from you, with a slight micro-bevel at the very last. There is no need to file the faces (the face of the tooth is the surface most perpendicular to the handle; the back is at an angle), which is what a metate does, cutting down with the saw edge of the yasuri to make the teeth longer. The burr is quickly knocked off with a light sweep, not touching the edge. Flip the saw and vise around, and the backs on the other side are done the same way. Test the saw in scrap wood, and if it doesnt track straight, start over until it does.
If you work mostly hardwoods, you can make the angles less acute, the face more upright. If your wood is kiln-dried,
you will need less set; if your saw is not straight, or you need more set, you need metate. To point up crosscut
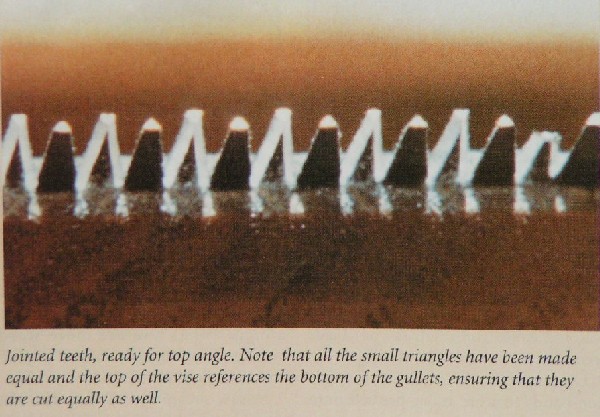
teeth, joint very lightly, removing just enough metal to show triangles as opposed to ovals. The less the better.
A metate would cut down to make the teeth longer, and then file the backs to the proper angle; you just want to
establish a straight regular reference plane, leaving as much of the top face angle as possible. Use a small yasuri,
but with the edges ground and polished smooth. This edge would otherwise cut into the face edge of the teeth, which
would be disastrous. You can use the vise as a guide to maintain the yasuri at a consistent angle by raising or
lowering the blade in the vise until the bottom of the gullets is in line with the extreme top edge of the vise.
Hardly any pressure is necessary, and short strokes, even for larger 270mm saws, are enough. A metate would file
off the top angle, then the backs, then the fronts, which are the real cutting edge. In the photo, all the tops
are the same size and ready for the top angle. Again, make test cuts, and repeat if it doesnt cut straight. The
larger the saw, the better it is for learning. After filing, the metate would set the teeth (asari) with a hammer
and anvil. Each tooth is hit 36 times, depending on the size of the teeth. The hammer lands in the same place
each time. The saw is moved after each hit, advancing the tooth further onto the rounder edge of the anvil. The
blade is held at an angle, tipped down, with the finger on the underside of the saw, against the anvil, using it
as a reference, as the blade is advanced from tooth to tooth, skipping every other tooth. After setting one-third
of the teeth, the hold is moved, and the middle one-third is done. The hold is moved again, and the last one-third
are set. The saw is flipped end-for-end, and the teeth on the other side are set over the same way. Asari only
takes about 10 minutes, once you get the hang of it, although it took me a month to get the hang of it.
Mark Grable